Atreidae
(Was an) Installer
You can all thank 12VoltKing for getting me to post this here.. as I'm a lazy ass
anyway enjoy the guide
Update Jan 2010
I have been meaning to repost the pics for ages.
anyway, here they are.
[Disclaimer!]
By Continuing to read this article you agree to not hold myself, my company, the owner of this website or any of their / my partners liable for ANY damages being civil, physical or mental caused by using the information in this document.
This document is NOT a guide on how to Install a car stereo. It is simply my notes and observations posted on the Internet for you to use however you deem fit
If you do not agree to the above terms please press "back" on your browser
[End Disclaimer]
[update for stupid users!]
Just an update for those thinking of PM'ing me absolute Bull, I'm not interested don't waste my time, and once again
I cant possibly see how you can damage your vehicle following the instructions on this page, but if you do its your own damn fault. Any PM's that come into my mailbox that are just plain stupid WILL be posted on chibiko.net and you will be made fun of (Ill even send you a bill for the hosting and advertising whilst I'm at it)
Whilst most of JC appreciates what I do and the time I gave up to make and post this guide the ones that don't grind my gears!
(you know who you are)
[End stupid users]
[the same as above in normal speak]
**** it up? don't come crying to me or anyone else.. don't know what your doing get a pro to do it
[/the same as above in normal speak]
I can recommend a few places, but I'm sure that there is a TON of sponsors to the JC website that can help
Okay. First off just a few notes.
Revisions
23rd may 2005
-added wiring colours (thanks 12voltking)
-added headunit check warning
4th october 2005
-Updated contact details
29 Jan 2006
-Added "******************" to list of allowed sites
05 Apr 2006
-Added "Ausrevs.com" to list of allowed sites
-Removed "Commodoreclub.net" from list of allowed sites
04 may 06
-Added "Justcommodores.com" to list of allowed sites
29th Jan 2010
-Reposted images
-Tons of spelling fixes. (daym!)
-Minor grammatical revisions
Errors and alterations
Some of the instructions in this guide may be inaccurate or be slightly different for your model commodore.
For example the VG,VS bench seat models have a different console.
I will endeavour to update this guide to suit the slightly varied models.
Take care and be responsible
Any advice or guidance given in this tutorial should be taken as such. advice. its not my problem if you car catches fire, runs over an old lady or your headunit explodes. be thankful you have any help at all. if you don't know what you are doing, seek the help of a pro.
For use by authorised domains only
I dont want to see this guide posted on any other car websites without my exclusive permission, the images are hosted on my personal webspace and will soon be rolling over to my personal webserver. I dont take well to hotlinking or image stealing.
if this guide is not on one of the following domains it has been stolen.
www.chibiko.net
www.ausrevs.com
www.justcommodores.com
www.******************
And now to the guide.
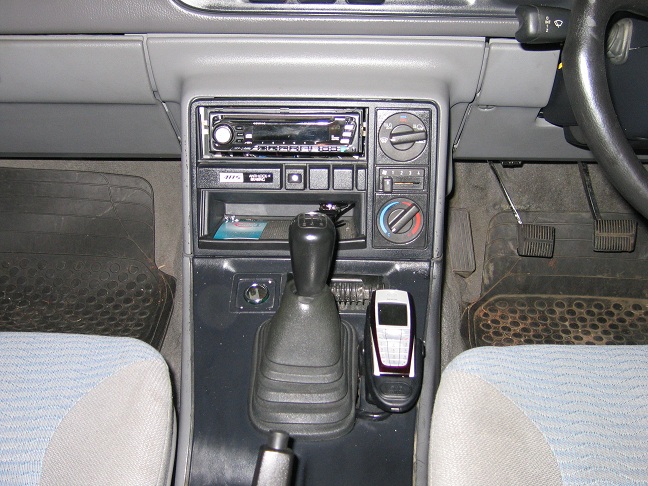
Normal view of the centre console.
Ignore my handsfree on the right... this is the section of car we want to pull apart. you will notice I had a manual.. most of the instructions apply for the auto as well.. but I will point out any differences

Tools Required to disassemble console
1 x flat blade screw driver
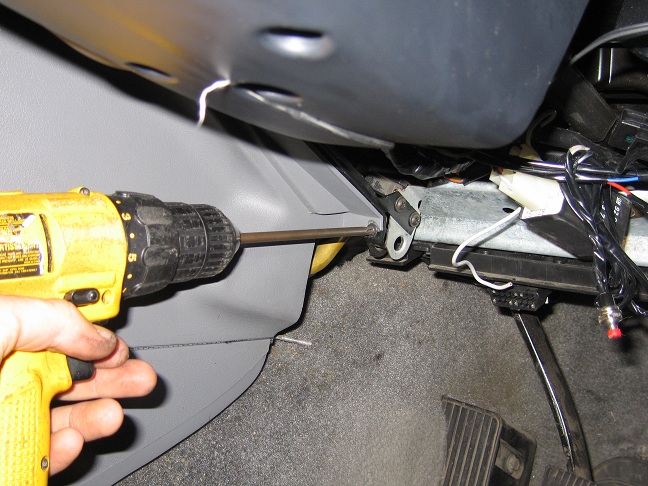
1 x phillips head screwdriver (preferably a cordless drill)
1 x clean back seat
1 x coffee
(N.B coffee can be substitute for any drink.. preferably beer or bourbon. but some of us need to drive after installing)
Begin by opening the drivers side dash panel (fuse panel) under the steering wheel.. using either the screwdriver or your keys.

Now remove the locator pin in the hinge on the side closest to the centre console, usually achieved with a little prying from your screwdriver (blurry pic)
Now remove the dash panel and place it on your back seat
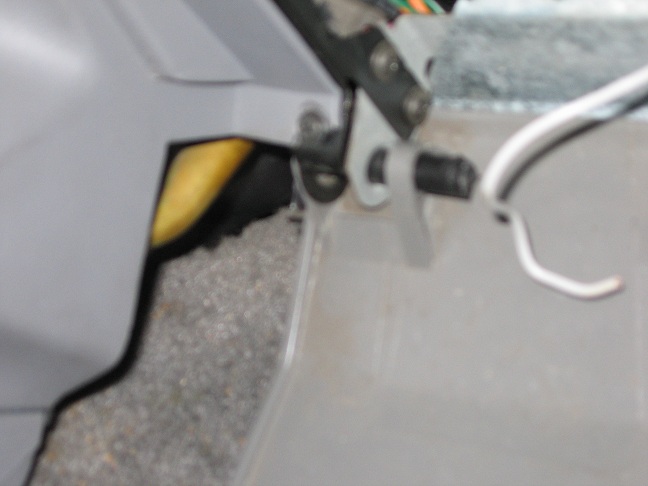
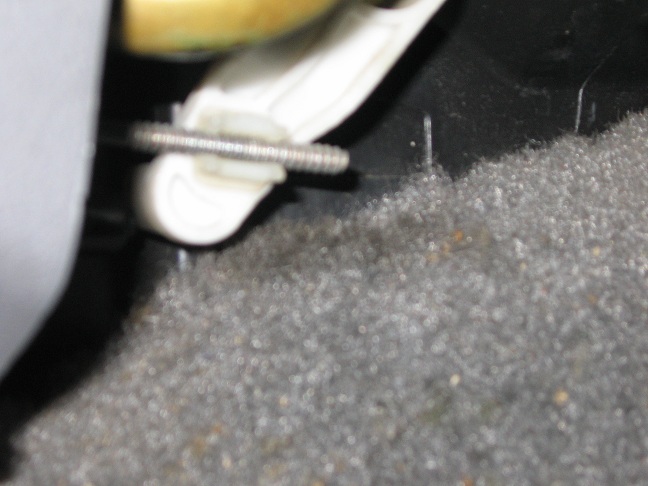
Whilst your down here its a pretty good time to disconnect the heater control rod. look towards the tunnel from the foot well.. near the heater pipelines should be a white plastic leaver with a steel rod through it.
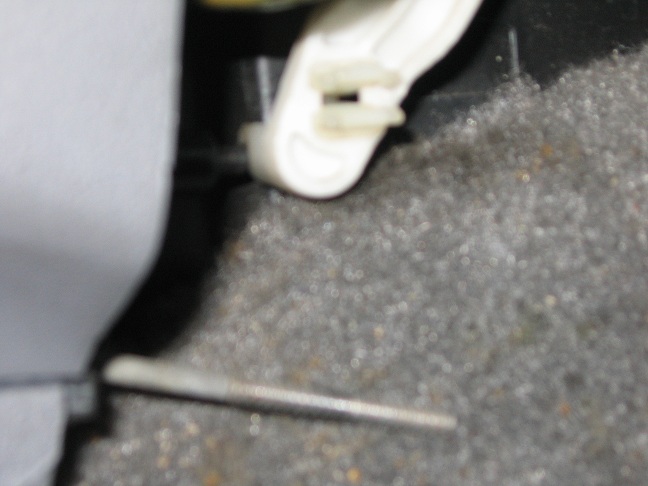
unclip the protective cover on the lever (this breaks about 50% of the time.. don't stress, tiny dab of hot glue later). pull the rod out of the lever arm
(this is quite different on climate controlled cars. when I get my hands on one.. I will post a supplement on it)
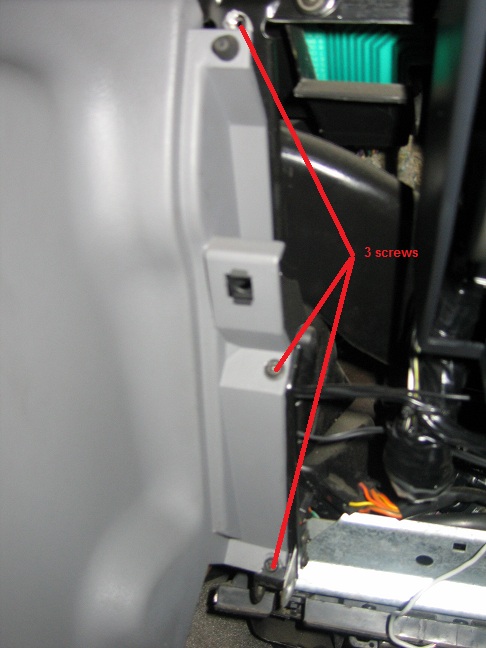
Remove the three screws located on the right hand side of the centre console. store somewhere safe
Clean out your glove box!
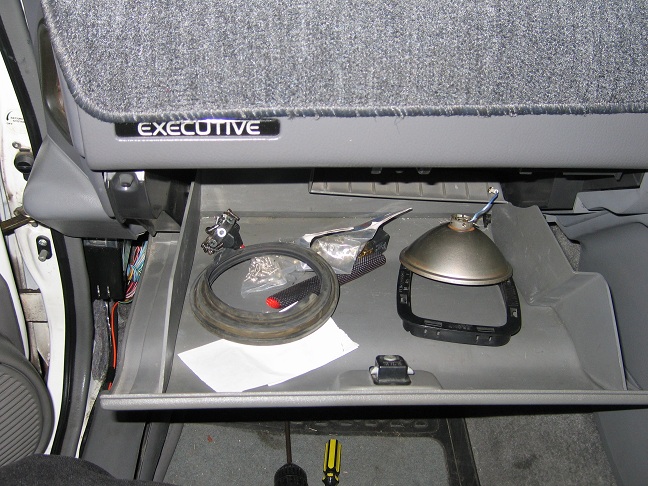
Remove the locator pin on the right and side of the glove box at the back.. its much the same as the dash panel one. but may need more "convincing" to get it out. if all else fails try a set of bent long nose pliers..

Remove and place glove box on back seat
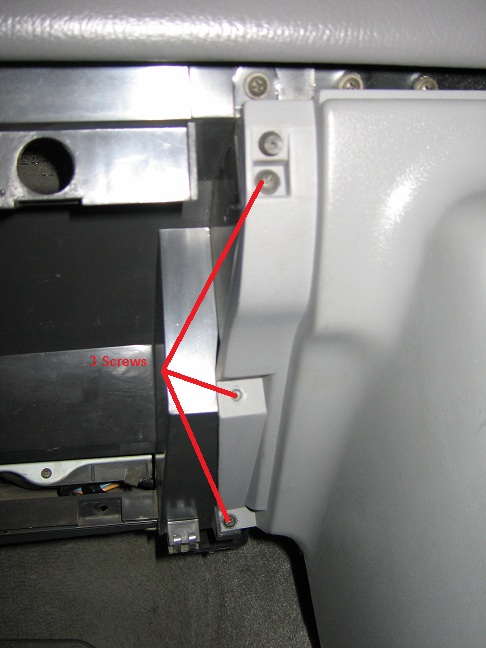
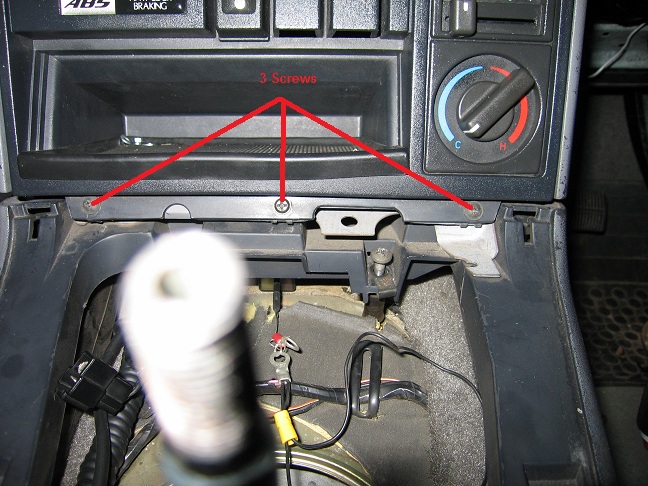
Remove the three screws on the left side of the centre console. and store somewhere safe (notice, I'm missing one)
Drink Coffee.
Ensure the handbrake is applied and works!
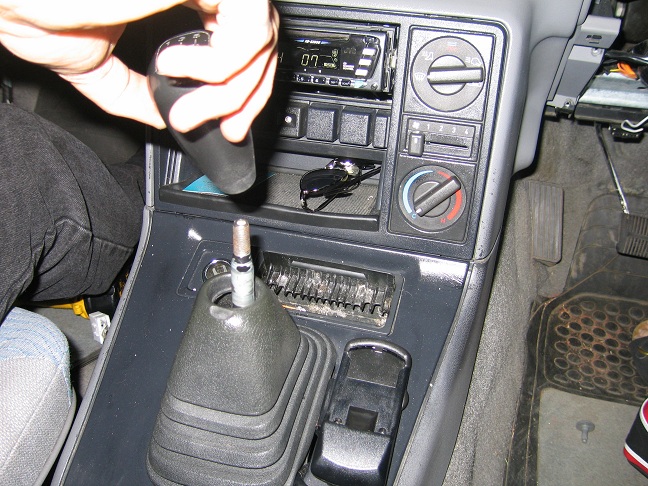
(Manual only)Place in neutral and remove gear shift knob by rotating in an anticlockwise direction
(Auto only) Place selector in D
Remove ashtray by pulling it out
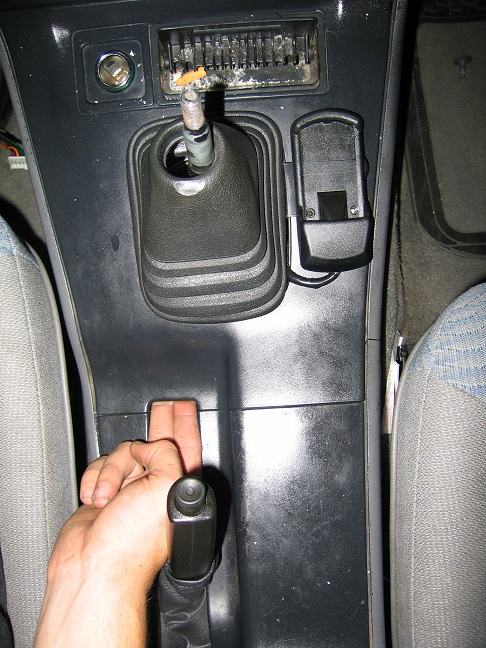
Using Two fingers pry up the transmission cover starting from the hand brake
with the cover lifted disconnect the cigarette lighter and illumination harnesses from the cover. these are simple push clip style connectors.. push the retaining tongue in and pull the connector apart.
remove cover and place on back seat (look, I'm missing a boot, no-wonder the car is smelly)
(auto only) Take care when removing the cover. you will need to rotate the cover 90 degrees counterclockwise to overcome the T shifter. also be careful of the plastic plate with the gear letters printed on it. you may want to marks its position on the serrated tooth edge incase you move it.
Loosen off these 2 screws a fair amount.. the centre console should "drop" slightly (don't remove the screws, they should just stand proud 15-20mm)
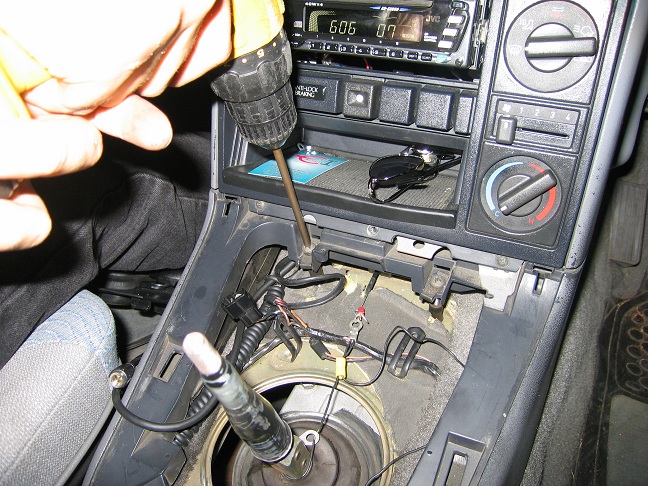
Remove these 3 screws and store safe.
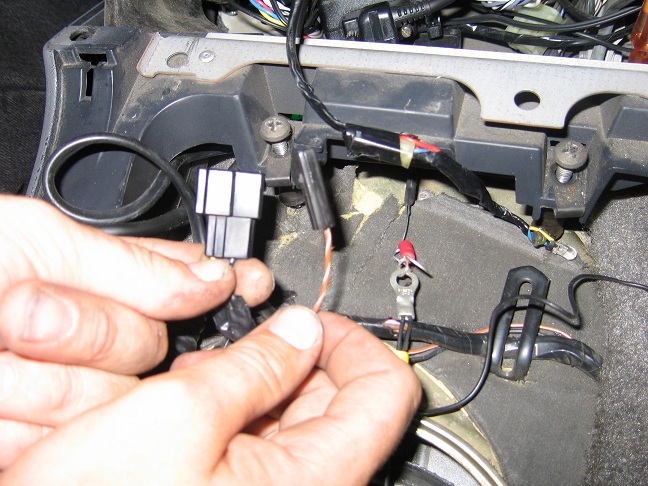
Gently remove outer trim of console.. disconnect any accessories like power antenna controls, a/c etc etc and the security LED (this normally pops out of the dash before you get the plug undone, another hot glue job for later)
place on back seat.
Drink more coffee
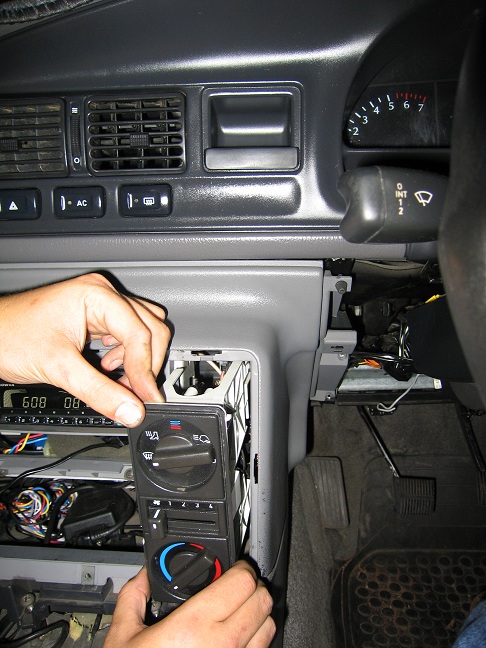
Remove the screw located on the heater control
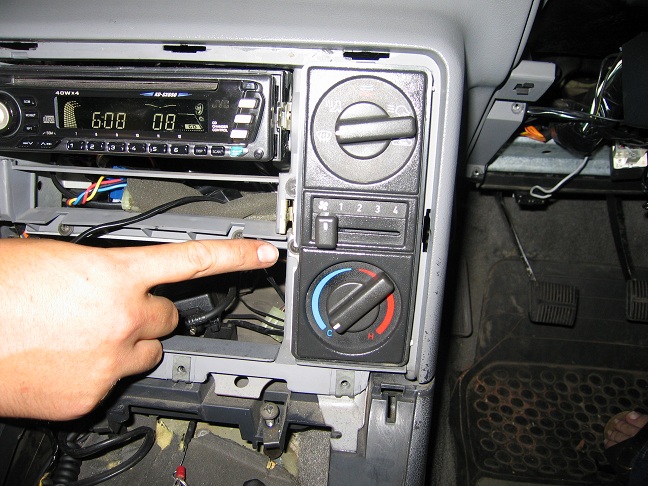
Remove heater control disconnecting the fan and illumination looms..
be very gentle disconnecting the vacuum cluster.. breaking it is not fun.
(this may be quite different on climate controlled cars. when i get my hands on one.. I will post a supplement on it)

Almost there.
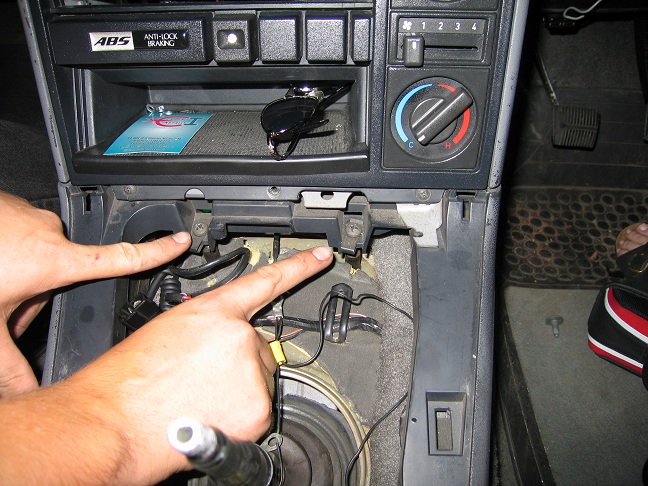
Remove these screws and store in a safe place.
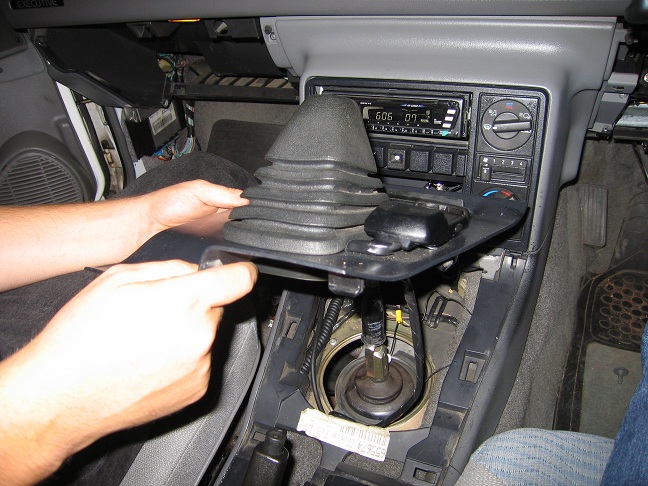
Press Down on the centre console like as below. this helps when removing the console in a second
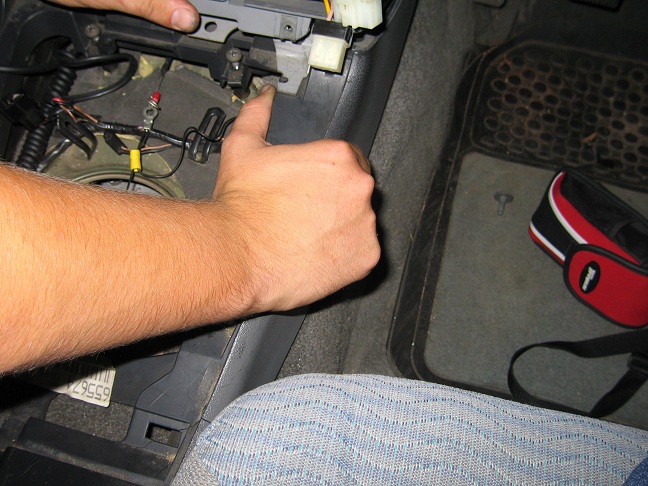
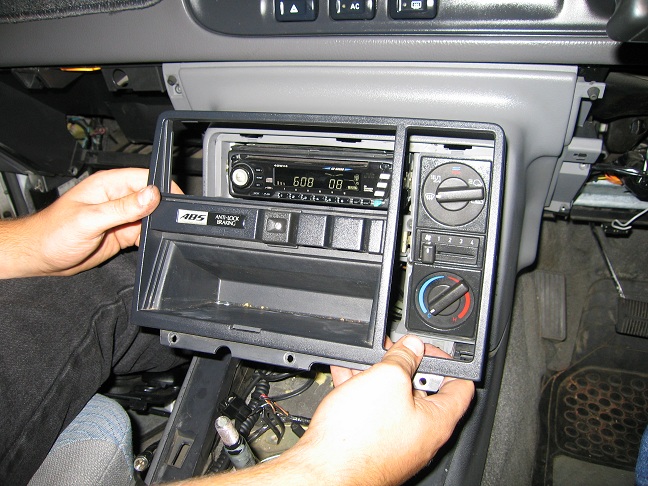
Pull the main shroud down as to overcome the lip from the main crash pad. and out.. be careful of the two plastic pins stuck in the centre console (this is why we pushed it down before)
store on back seat
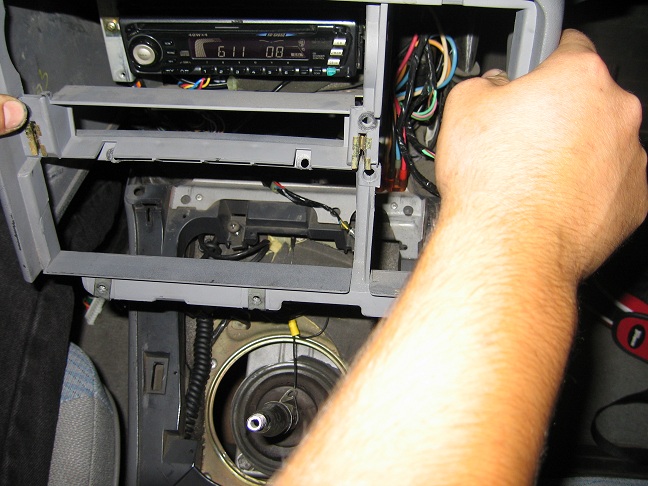
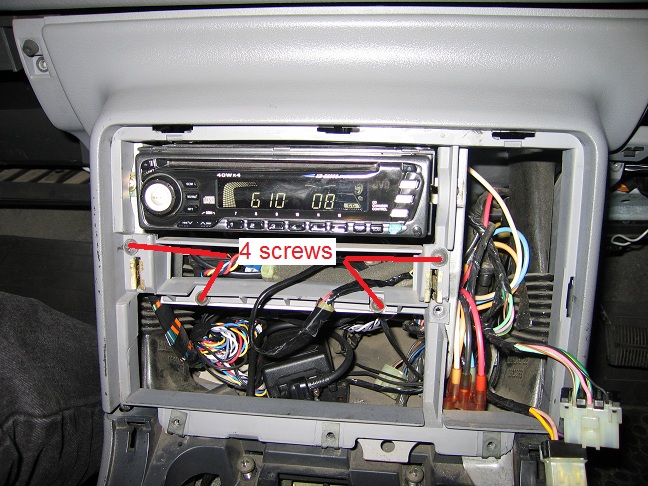
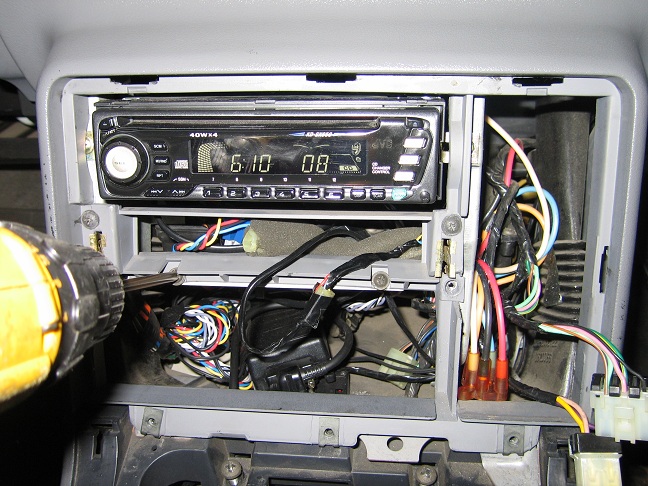
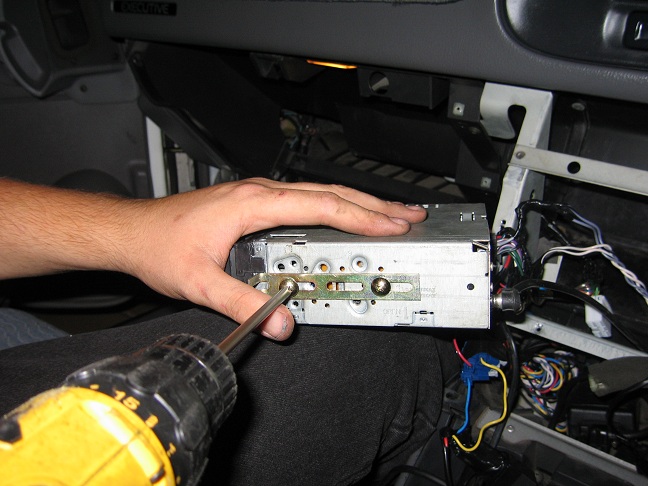
Remove the 2 screws holding the stereo onto the framework.
(photo missing.. will fix soon)
Viola the stereo is in your hands
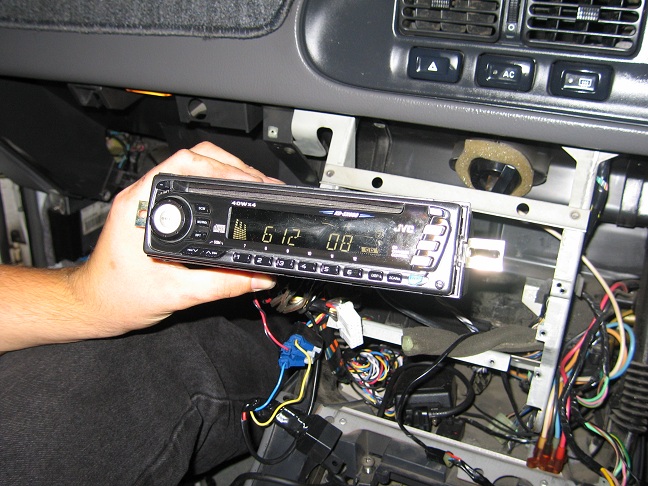
Now the wiring information.
either use a conversion kit.. (you can normally get these at superchit) or solder inline with the factory plug.. don't cut it off leave it on in case you ever want to remove your new head unit and stick the old one back in. (hey it happens, you know. when you buy that other commodore..)
thanks to 12voltking for the wiring diagram (i couldn't be bothered)
Orange = constant 12V
yellow = accessories
Black = earth (or use the metal chassis)
Brown/white = illumination
yellow/red = elec aerial
dark green(-) & light green(+) = front right
tan(+) & grey(-) = front left
dark/black(-) & blue red(+) = rear right
brown/black(+) & yellow/blue(-) = rear left
to make a bracket to suit your new aftermarket stereo.. you can either drill a hole through the factory brackets. (measurements one day... maybe another 5 years) or just make some out of central locking back straps (you can normally pick these up at jb, strathfield etc etc just ask one of the service techs)
You can see my phone here for comparison
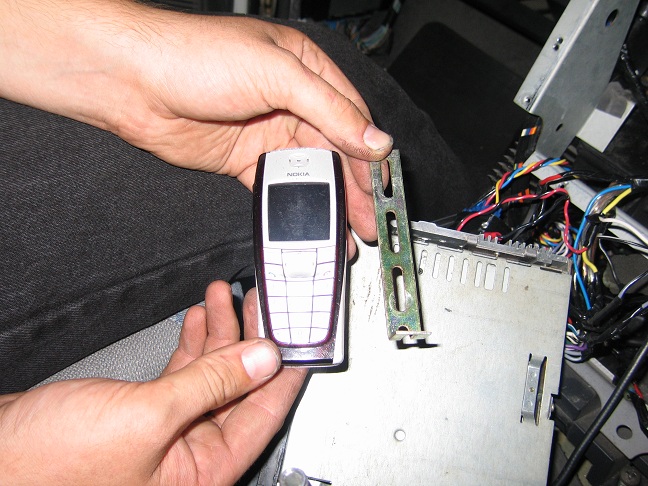

The factory Holden stereo loom doesn't always contain illumination. you can get an illumination trigger off the heater controls but I find it easiest to just run a tag wire from the cigarette lighter. the wire is Brown/white and is on a plug by its self.
Try and keep your wiring neat and tidy.. tape it all up into a neat loom if need be, less mess = easier to put back together.
Putting it all back together is pretty much the reverse of the instructions here.
things to take note of during reassembly
once the headunit is screwed back in TEST EVERYTHING!
am/fm reception
cd playability
stacker control (if applicable)
turn your headlights on with the headunit running (if it turns off, your Earth is WRONG!)
set the time and a few fm stations
turn the ignition OFF and remove your key
turn back on and check it still remembers the time/stations etc
Be careful when reconnecting the vacuum cluster to the heater controls. start the car and test that you can select all the different zones before you continue.. you don't want to pull it apart again because you buggered it up.
the two screws you loosened earlier on the centre console control the level of the console. don't do these up tight.. just enough to raise the level back up and make everything line up again.
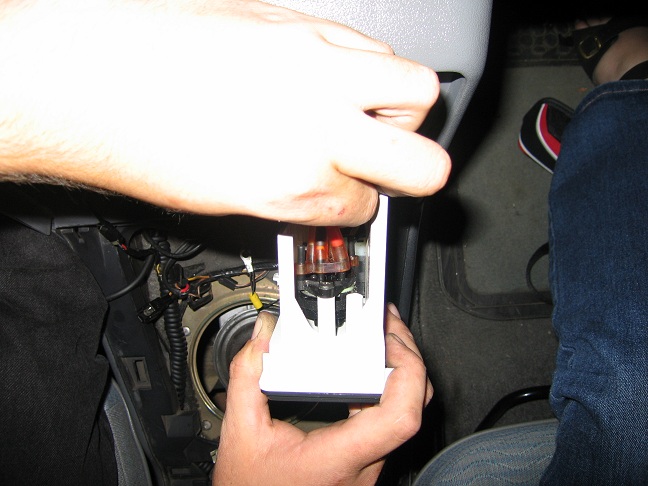
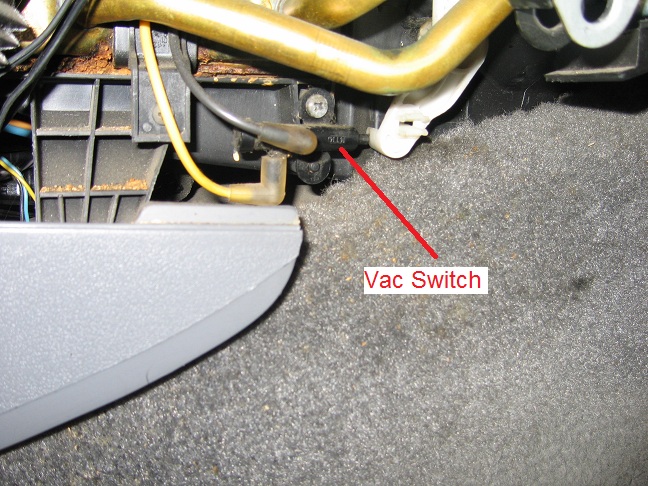
When reconnecting the steel rod into the leaver arm (near heater pipes) ensure that the heat selector is on cold.. all the way. then pull the arm as far back as you can. it should press on a little vacuum switch. insert the rod into the arm and replace clip (add a tiny dab of hot glue if you fubared it before)
(vacuum switch shown here with console apart for ease of view. console will obviously be together when fitting the rod)
(auto only)
you may need to readjust the gear indicator panel if you bumped it.. fairly easy done. not much hassle involved
Now if you have any problems pm me.. I'm normally on every night.
desperate can call my mobile 0432500648 but don't expect me to drop everything to take your call. I do have to work too you know
IMPORTANT!!!
If you call me for head unit advice you need to tell me you read my guide straight off, or I'm just going to fob you off like the ten billion other idiots who think they can install stereos
anyway enjoy the guide
Update Jan 2010
I have been meaning to repost the pics for ages.
anyway, here they are.
[Disclaimer!]
By Continuing to read this article you agree to not hold myself, my company, the owner of this website or any of their / my partners liable for ANY damages being civil, physical or mental caused by using the information in this document.
This document is NOT a guide on how to Install a car stereo. It is simply my notes and observations posted on the Internet for you to use however you deem fit
If you do not agree to the above terms please press "back" on your browser
[End Disclaimer]
[update for stupid users!]
Just an update for those thinking of PM'ing me absolute Bull, I'm not interested don't waste my time, and once again
I cant possibly see how you can damage your vehicle following the instructions on this page, but if you do its your own damn fault. Any PM's that come into my mailbox that are just plain stupid WILL be posted on chibiko.net and you will be made fun of (Ill even send you a bill for the hosting and advertising whilst I'm at it)
Whilst most of JC appreciates what I do and the time I gave up to make and post this guide the ones that don't grind my gears!
(you know who you are)
[End stupid users]
[the same as above in normal speak]
**** it up? don't come crying to me or anyone else.. don't know what your doing get a pro to do it
[/the same as above in normal speak]
I can recommend a few places, but I'm sure that there is a TON of sponsors to the JC website that can help
Okay. First off just a few notes.
Revisions
23rd may 2005
-added wiring colours (thanks 12voltking)
-added headunit check warning
4th october 2005
-Updated contact details
29 Jan 2006
-Added "******************" to list of allowed sites
05 Apr 2006
-Added "Ausrevs.com" to list of allowed sites
-Removed "Commodoreclub.net" from list of allowed sites
04 may 06
-Added "Justcommodores.com" to list of allowed sites
29th Jan 2010
-Reposted images
-Tons of spelling fixes. (daym!)
-Minor grammatical revisions
Errors and alterations
Some of the instructions in this guide may be inaccurate or be slightly different for your model commodore.
For example the VG,VS bench seat models have a different console.
I will endeavour to update this guide to suit the slightly varied models.
Take care and be responsible
Any advice or guidance given in this tutorial should be taken as such. advice. its not my problem if you car catches fire, runs over an old lady or your headunit explodes. be thankful you have any help at all. if you don't know what you are doing, seek the help of a pro.
For use by authorised domains only
I dont want to see this guide posted on any other car websites without my exclusive permission, the images are hosted on my personal webspace and will soon be rolling over to my personal webserver. I dont take well to hotlinking or image stealing.
if this guide is not on one of the following domains it has been stolen.
www.chibiko.net
www.ausrevs.com
www.justcommodores.com
www.******************
And now to the guide.
Normal view of the centre console.
Ignore my handsfree on the right... this is the section of car we want to pull apart. you will notice I had a manual.. most of the instructions apply for the auto as well.. but I will point out any differences
Tools Required to disassemble console
1 x flat blade screw driver
1 x phillips head screwdriver (preferably a cordless drill)
1 x clean back seat
1 x coffee
(N.B coffee can be substitute for any drink.. preferably beer or bourbon. but some of us need to drive after installing)
Begin by opening the drivers side dash panel (fuse panel) under the steering wheel.. using either the screwdriver or your keys.
Now remove the locator pin in the hinge on the side closest to the centre console, usually achieved with a little prying from your screwdriver (blurry pic)
Now remove the dash panel and place it on your back seat
Whilst your down here its a pretty good time to disconnect the heater control rod. look towards the tunnel from the foot well.. near the heater pipelines should be a white plastic leaver with a steel rod through it.
unclip the protective cover on the lever (this breaks about 50% of the time.. don't stress, tiny dab of hot glue later). pull the rod out of the lever arm
(this is quite different on climate controlled cars. when I get my hands on one.. I will post a supplement on it)
Remove the three screws located on the right hand side of the centre console. store somewhere safe
Clean out your glove box!
Remove the locator pin on the right and side of the glove box at the back.. its much the same as the dash panel one. but may need more "convincing" to get it out. if all else fails try a set of bent long nose pliers..
Remove and place glove box on back seat
Remove the three screws on the left side of the centre console. and store somewhere safe (notice, I'm missing one)
Drink Coffee.
Ensure the handbrake is applied and works!
(Manual only)Place in neutral and remove gear shift knob by rotating in an anticlockwise direction
(Auto only) Place selector in D
Remove ashtray by pulling it out
Using Two fingers pry up the transmission cover starting from the hand brake
with the cover lifted disconnect the cigarette lighter and illumination harnesses from the cover. these are simple push clip style connectors.. push the retaining tongue in and pull the connector apart.
remove cover and place on back seat (look, I'm missing a boot, no-wonder the car is smelly)
(auto only) Take care when removing the cover. you will need to rotate the cover 90 degrees counterclockwise to overcome the T shifter. also be careful of the plastic plate with the gear letters printed on it. you may want to marks its position on the serrated tooth edge incase you move it.
Loosen off these 2 screws a fair amount.. the centre console should "drop" slightly (don't remove the screws, they should just stand proud 15-20mm)
Remove these 3 screws and store safe.
Gently remove outer trim of console.. disconnect any accessories like power antenna controls, a/c etc etc and the security LED (this normally pops out of the dash before you get the plug undone, another hot glue job for later)
place on back seat.
Drink more coffee
Remove the screw located on the heater control
Remove heater control disconnecting the fan and illumination looms..
be very gentle disconnecting the vacuum cluster.. breaking it is not fun.
(this may be quite different on climate controlled cars. when i get my hands on one.. I will post a supplement on it)
Almost there.
Remove these screws and store in a safe place.
Press Down on the centre console like as below. this helps when removing the console in a second
Pull the main shroud down as to overcome the lip from the main crash pad. and out.. be careful of the two plastic pins stuck in the centre console (this is why we pushed it down before)
store on back seat
Remove the 2 screws holding the stereo onto the framework.
(photo missing.. will fix soon)
Viola the stereo is in your hands
Now the wiring information.
either use a conversion kit.. (you can normally get these at superchit) or solder inline with the factory plug.. don't cut it off leave it on in case you ever want to remove your new head unit and stick the old one back in. (hey it happens, you know. when you buy that other commodore..)
thanks to 12voltking for the wiring diagram (i couldn't be bothered)
Orange = constant 12V
yellow = accessories
Black = earth (or use the metal chassis)
Brown/white = illumination
yellow/red = elec aerial
dark green(-) & light green(+) = front right
tan(+) & grey(-) = front left
dark/black(-) & blue red(+) = rear right
brown/black(+) & yellow/blue(-) = rear left
to make a bracket to suit your new aftermarket stereo.. you can either drill a hole through the factory brackets. (measurements one day... maybe another 5 years) or just make some out of central locking back straps (you can normally pick these up at jb, strathfield etc etc just ask one of the service techs)
You can see my phone here for comparison
The factory Holden stereo loom doesn't always contain illumination. you can get an illumination trigger off the heater controls but I find it easiest to just run a tag wire from the cigarette lighter. the wire is Brown/white and is on a plug by its self.
Try and keep your wiring neat and tidy.. tape it all up into a neat loom if need be, less mess = easier to put back together.
Putting it all back together is pretty much the reverse of the instructions here.
things to take note of during reassembly
once the headunit is screwed back in TEST EVERYTHING!
am/fm reception
cd playability
stacker control (if applicable)
turn your headlights on with the headunit running (if it turns off, your Earth is WRONG!)
set the time and a few fm stations
turn the ignition OFF and remove your key
turn back on and check it still remembers the time/stations etc
Be careful when reconnecting the vacuum cluster to the heater controls. start the car and test that you can select all the different zones before you continue.. you don't want to pull it apart again because you buggered it up.
the two screws you loosened earlier on the centre console control the level of the console. don't do these up tight.. just enough to raise the level back up and make everything line up again.
When reconnecting the steel rod into the leaver arm (near heater pipes) ensure that the heat selector is on cold.. all the way. then pull the arm as far back as you can. it should press on a little vacuum switch. insert the rod into the arm and replace clip (add a tiny dab of hot glue if you fubared it before)
(vacuum switch shown here with console apart for ease of view. console will obviously be together when fitting the rod)
(auto only)
you may need to readjust the gear indicator panel if you bumped it.. fairly easy done. not much hassle involved
Now if you have any problems pm me.. I'm normally on every night.
desperate can call my mobile 0432500648 but don't expect me to drop everything to take your call. I do have to work too you know
IMPORTANT!!!
If you call me for head unit advice you need to tell me you read my guide straight off, or I'm just going to fob you off like the ten billion other idiots who think they can install stereos
Last edited:
